

To begin, lets look at some examples of laser shows that are commonly created throughout the industry.
To create shows like these, you need to begin by deciding what type of laser control hardware works best for your specific needs.
Everyone has different requirements, and understanding laser control hardware and how it connects to the laser projector, will provide a solid foundation for you to begin working from. Let's review the commonly used laser control hardware within the laser show industry, so that you can see how these items come together and get a better understanding of what type of laser setup is best for you.
FB3QS Hardware - Simple, plug-and-play, laser control hardware
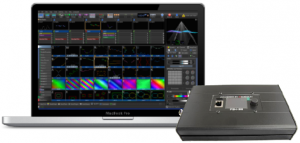
The FB3QS hardware is a simple and easy to use laser control hardware, great for people who are new to lasers. It connects to your PC via USB, and then to the laser projector using an ILDA cable.
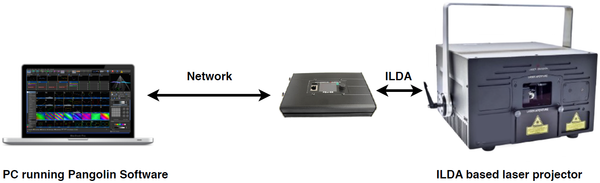
Basic diagram showing FB3QS with laser setup
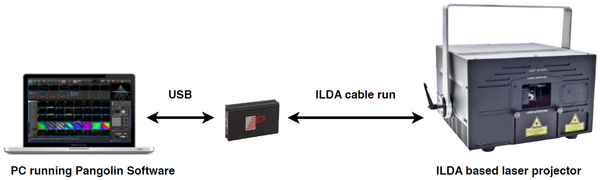
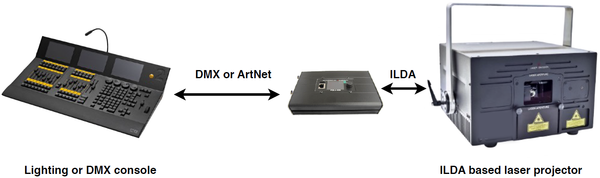
NOTE: Here we have PC running Pangolin software. It connects to the FB3QS via USB, and then to the laser projector using an ILDA cable run. You can also control this setup from a DMX console if you desire. But it requires the use of a third party DMX hardware, called the Enttec. In addition, it is recommended that you do not run the ILDA cable longer than 150ft.
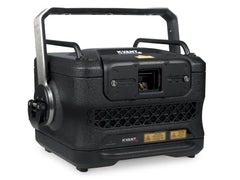
Showing FB3QS Hardware
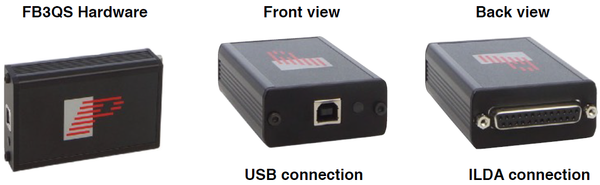
Protocols supported: USB, ILDA (DMX and ArtNet through Pangolin software with Enttec)
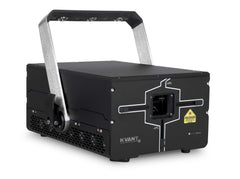
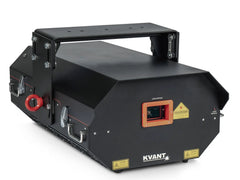
FB4 INSIDE - The future of laser projectors
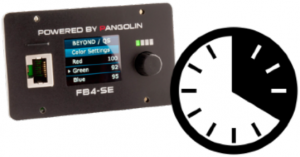
Showing FB4SE Hardware inside a laser
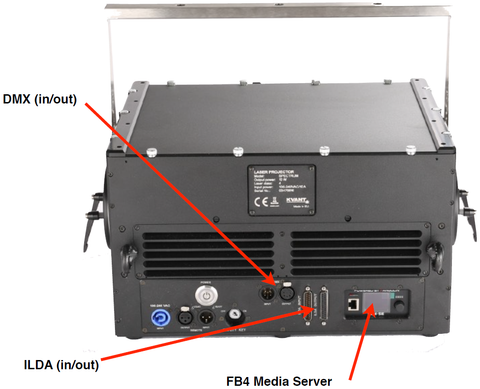
- Protocols supported: Network, DMX, ArtNet, Stand-alone, ILDA
- Network and ArtNet in/out (ethercon available)
- Full color display (controls colors, safety, geometry and more)
- Real Time Clock (for stand alone operation - i.e. auto-mode)
- SD Memory System (up to 64GB)
- DMX in/through
- ILDA in/through
The latest technology on the market now, is having the FB4 media server entirely integrated with your laser projector. This setup offers a wide variety of advantages, as it dramatically simplifies the control setup, reduces cabling, and makes control of multiple laser projector shows so much easier. Not only that, but it allows lighting professionals to integrate lasers into multimedia setups, in a much more convenient way. Currently most professional laser projectors have the ability for FB4 to be integrated, and in time, all laser projectors will operate in this manner. It truly is, the future of laser show technology in that regard.
When working with FB4, there are three powerful, yet easy to use setups, for controlling your laser show. These are outlined below.
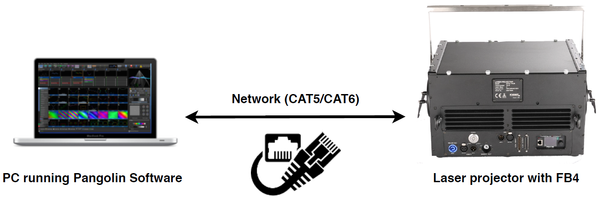
How to use FB4 inside your laser
PC mode - Simply run a network cable from your PC to your laser projector with FB4, and you are setup and done. It’s just that simple.
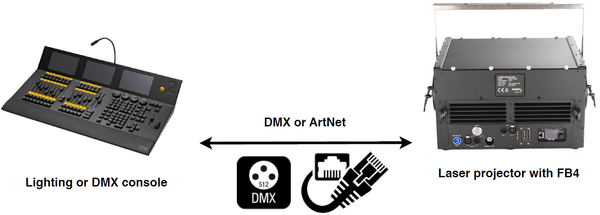
Lighting console mode - Lasers with FB4 support both the DMX and Art Net protocols. And as mentioned above FB4 also has on board SD card memory. This makes it easy to control a laser with FB4, from any lighting or DMX console. Simply create your laser content in software (QuickShow or BEYOND), and save it to FB4. Then, you can run a DMX or ArtNet feed to the laser projector with FB4 and you are setup and done. You can then control your laser with FB4 from any lighting or DMX console of your choice.
Stand alone operation (RTC) - All lasers with FB4 inside support a standard called “RTC” or real time clock. We also call this “stand alone operation” or “auto mode”. When using a laser with FB4 in this setup, you can create your content in laser design software (like QuickShow or BEYOND), and then save it to the memory system on the FB4. FB4 has a built in clock, so that you can tell the system to play the show or content you created back, at a specified date and time. And you do not need to have a PC, console or anything connected, to trigger the playback. Just run power to the laser, and you are setup and done. The show will run itself automatically, without the need of for PC or console, to trigger and start the show.
You can also update content on the laser with FB4, over a network cable. Making it very easy to change and edit content, when you need to.
- Let’s say you programmed a show, and you want it to run every Friday evening at 20:00 hours (8:00pm). You can create that content in laser design software like QuickShow or BEYOND, save it to FB4, and then set the clock on FB4 to play it back automatically at that specified date and time. As long as the laser projector with FB4 inside has power, the show will run automatically at the date and time you specified. And no PC or console needs to be used to trigger this.
Step 1 - Program your content in software, and save to FB4 inside your laser.
* NOTE - You can also send content to the memory of FB4 on your laser, over the network
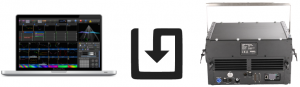
Step 2 - Set the clock on FB4, to display that content at a given date and time.
Step 3 - Your show will run itself automatically, at the date and time you specified. No PC or console needed to trigger this. It is truly automatic, in that regard.
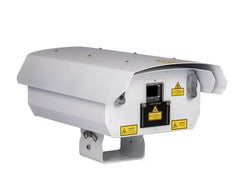
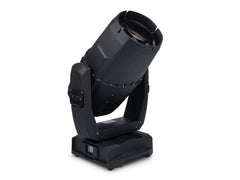
FB4 EXTERNAL - An external media server, for laser shows
Showing FB4SE Hardware in external exclosure
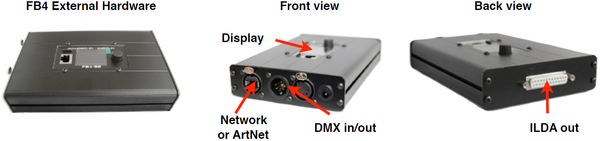
Protocols supported: Network, DMX, ArtNet, Stand-alone, and ILDA
FB4 is a media server for laser shows. It is a network based control system with support for all major lighting protocols (network, DMX, ArtNet, stand-alone and ILDA). It features a full color display, as well as an onboard SD card memory system. When using an external FB4 device, you open up a few more control possibilities. These are briefly described below.
How to use FB4 external with your laser
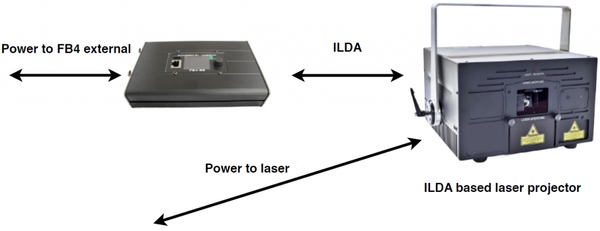
PC mode - Simply run a network cable from your PC to the FB4 external hardware, and then from the hardware, run an ILDA cable to the back of the laser.
Lighting console mode - FB4 supports both the DMX and ArtNet protocols and as mentioned above it has on board SD card memory. When operating in lighting console mode, you can create your content in software (QuickShow or BEYOND), and save it to FB4. Then, you can run a DMX or ArtNet feed to the FB4 external hardware, and then an ILDA cable to the laser projector. You then control the content on FB4, from the lighting or DMX console of your choice.
Stand alone operation (RTC) - All FB4 devices support a standard called “RTC” or real time clock. We also call this “stand alone operation” or "auto mode". When using FB4 External in this setup, you can create your content in laser design software (like QuickShow or BEYOND), and then save it to the memory system on the FB4. FB4 has a built in clock, so that you can tell the system to play the show or content you created back, at a specified date and time. And you do not need to have a PC, console or anything connected, to trigger the playback. Just run power to the FB4 External and laser show projector, and the show will run itself automatically, without the need of a PC or console, to trigger and start the show.
- Let’s say you programmed a show, and you want it to run every Friday evening, at 20:00 hours (8:00pm). You can create that content in laser design software like QuickShow or BEYOND, save it to FB4, and then set the clock on FB4 to play it back automatically at that specified date and time. As long as the FB4 External and laser projector have power, the show will run automatically at the date and time you specified. And no PC or console needs to be used, to trigger this.
Step 1 - Program your content in software, and save to FB4
Step 2 - Set the clock on FB4, to display that content at a given date and time

Step 3 - Run your show in standalone mode (no PC or console required)
As long as the FB4 external and laser have power, your show will run at the specified date and time you define. You can also update content on the FB4, over a network cable.
Now that we understand laser control hardware, lets go a bit further and discuss how to setup laser shows.
"Two common questions we get about setting up laser shows..."
- How do I control multiple laser projectors at the same time?
- How do I make my lasers do something different, at the same time?
To begin, you should first understand the difference between “shared control” and “independent control”.
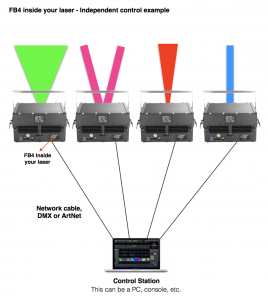
Independent control - This is where each of the lasers in your setup can do something different, at the same time. When working in this fashion, each laser projector needs to have it’s own control hardware behind it, so that it can receive an independent control signal from your control station. This is the most common type of laser setup, especially when working with multiple laser projectors, as it allows you to create more types of laser effects, and more sophisticated laser shows.
Shared control - This is where each of the lasers in your setup are doing the same thing, at the same time, as they are sharing the same control signal.
Understanding Zones - A zone is a feature inside of laser control that allows you define the exact area laser content will be projected. Each laser projector can also have multiple zones assigned to it, so that it can project content in multiple areas. When controlling multiple laser projectors in a show, zones also help you define which laser projector, content will go to. It’s a great feature, and helps you create better looking laser shows and effects.
Watch and learn - Check out this great tutorial video illustrating these principles in action (the tutorial was made using QuickShow software and FB3QS hardware, but again, the principles are universal in this regard).
CHECK OUT THE DIAGRAMS BELOW...
Independent Control Examples
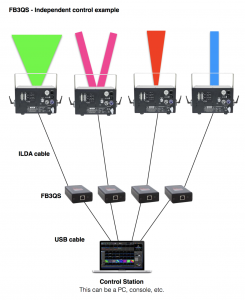
Each laser in this setup has it’s own FB3QS controlling it, so each laser can do something different at the same time.